In this chapter we will create a scenario. A scenario can be considered an enhanced sequence diagram, as it represents the interactions between a set of communicating parties, that reflects a particular path (or use case) through a business process.
The scenario differs from a standard sequence diagram in that it includes an example message with each interaction, that can be used for simulating the scenario against either the choreography or an actual implementation of the parties (i.e. services) defined in the choreography.
Although in this Getting Started Guide we are creating the scenario after the choreography has been defined, it is possible to create the scenario before the choreography exists. The benefit of this approach is that the scenarios can be used to document the business requirements for the distributed system being built. The disadvantage is, that as the choreography does not exist, it cannot be used to provide context information to the scenario editor, to help build the scenario.
In the following sections, we will first describe the creation of scenarios where a choreography already exists, and therefore provides context information to help define the scenario. However in a later section we will also explore how a scenario can be created where no choreography exists.
If you do not wish to build the scenario from scratch, then you can simply read through this section referring to the scenario contained within the Examples project that comes with the pre-configured pi4soa + Eclipse distribution. Alternatively, you can download the project from the examples section on the pi4soa website.
The scenario that we will be building is located within the file examples/purchasing/SuccessfulPurchase.scn
within the Examples project. This scenario represents a valid purchasing
use case, where a Buyer sends a buy
request to a Store, which then performs a credit check
request to a CreditAgency. In this scenario the
CreditAgency returns a 'credit ok' response, and therefore
the Store returns a confirmed response to the
Buyer.
As mentioned above, the difference between a pi4soa scenario, and a standard sequence diagram, is principally that it associates an example message with each interaction. These messages can either be included within the model, as a property on the message links, or defined externally within an XML file that is referenced by the message link as a URL. In this chapter, we will be defining the messages in their own XML files, which has the benefit of enabling the message to be re-used by multiple message links across multiple scenarios.
In the scenario described above, there are four messages required, one for each of the four interactions. In this simple example, the files can be named after the message type.
BuyRequest.xml
<BuyRequest id="1" />
CreditCheckRequest.xml
<CreditCheckRequest id="1" />
CreditCheckOk.xml
<CreditCheckOk id="1" />
BuyConfirmed.xml
<BuyConfirmed id="1" />
As you can see, these example messages are not particularly elaborate. However they provide the core information required when simulating a scenario against a choreography, the message type (in this case provided by the top level element), and the identity fields (which in this case is simply the id attribute on the top level element).
These example messages can be as elaborate as is required to express the requirements of the system, as long as they contain the core information required to identity the message type and identity for the purposes of correlating the message against an interaction in an associated choreography.
The first step is to create the scenario file, for the specific
use case outlined above. This is achieved by selecting the
New->Other ... menu item, associated with the
examples/purchasing folder.

When the following dialog window has been displayed, select the Scenario entry in the Choreography category.
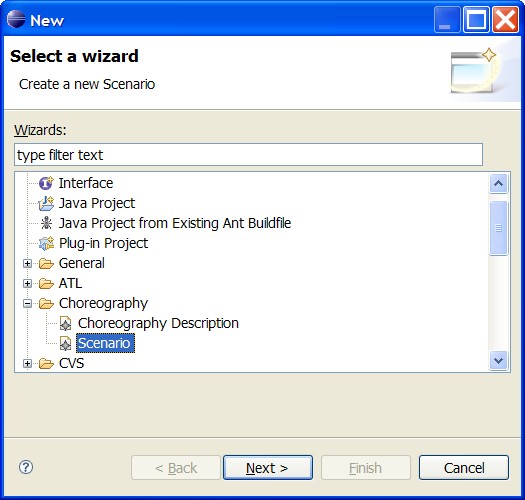
Then press the Next button.
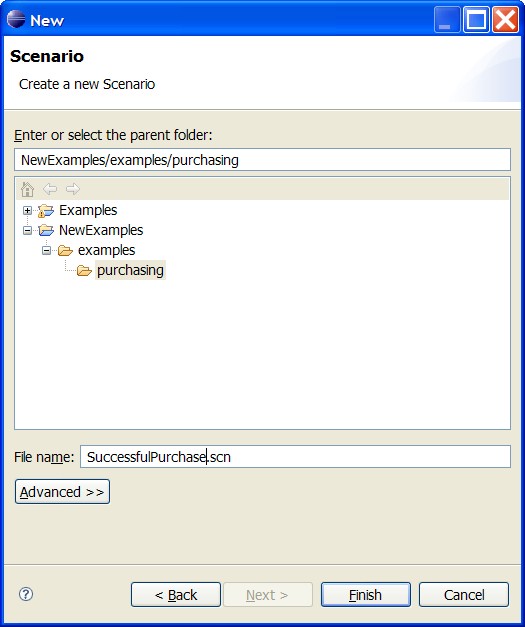
Enter the file name for the scenario, in this case SuccessfulPurchase.scn
and press the Finish button. This will
cause the empty scenario to be displayed in the Scenario Editor.
The next step is to configure the top level properties associated with the scenario, as presented in the Properties view.

In this situation, the choreography description has previously been defined
and therefore the relative path to the PurchaseGoods.cdm
file can be specified. The other important property is the
name, but the description
field is optional.
The next step is to place the participants onto the canvas. This can be achieved by dragging the Participant item from the palette onto the background. This should be done three times, one time per participant that we want to represent in the scenario.
To configure each participant, select it from the diagram and then define its type by selecting the appropriate value from the Type field in the Properties view, as shown below.

This should be done for the BuyerParticipant, StoreParticipant and CreditAgencyParticipant.
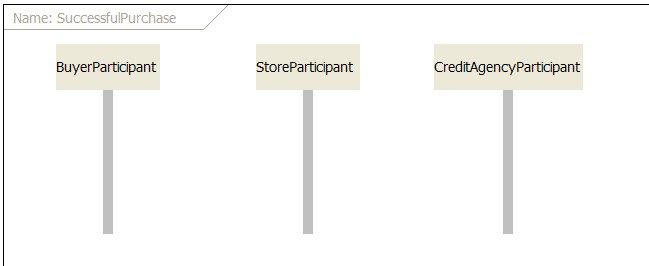
Note
In the preconfigured PurchaseGoods.cdm choreography and scenarios, the participant type names have been updated to remove the Participant suffix. However, if building the choreography, as described in the previous section, then this suffix will still be included, and therefore present in the entries in the dropdown menu for the Type field.
Now we are in a position to define the interactions between the participants to specify the use case. This can be achieved by selecting the Message Link item from the palette, then selecting the from participant, and dragging the link to the to participant. This will cause a message link to be defined between the two points, with the label Unknown to reflect the fact that no message definition has currently been assigned to the link.
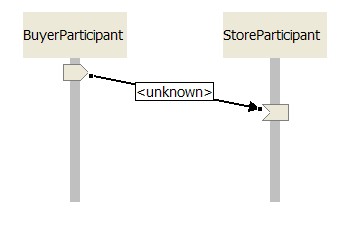
While the newly created message link is selected, select the dropdown menu associated with the Message field in the Properties view. This menu will contain any messages that are valid between the two relevant participants, in the direction indicated by the message link.

For the first message link, between the BuyerParticipant and StoreParticipant, will list the buy(BuyRequest) message definition only. This entry should be selected.
The only other field that needs to be filled in, at this stage, is
the reference to the relevant example message. For this message link
the Value URL field should be set to
BuyRequest.xml.
To complete this first scenario, create the following three remaining message links:
-
Credit Check Request
Create the message link by dragging the line from StoreParticipant to CreditAgencyParticipant. Then select the checkCredit(CreditCheckRequest) item from the Message dropdown menu, and specify the Value URL field as
CreditCheckRequest.xml. -
Credit Check Ok
Create the message link by dragging the line from CreditAgencyParticipant to StoreParticipant. Then select the checkCredit(CreditCheckOk) item from the Message dropdown menu, and specify the Value URL field as
CreditCheckOk.xml. -
Buy Confirmed
Create the message link by dragging the line from StoreParticipant to BuyParticipant. Then select the buy(BuyConfirmed) item from the Message dropdown menu, and specify the Value URL field as
BuyConfirmed.xml.
This should result in the completed scenario looking like this:

Once a choreography description has been associated with a scenario, by setting the Choreography Description URL field associated with scenario's properties, and the scenario has no errors reported in the Problems view, then it will be possible to simulate the scenario against the choreography description.
To simulate the scenario, either press the green 'play' button in the toolbar,

or use the popup menu associated with the Scenario Editor, to select the Scenario->Simulate menu item.
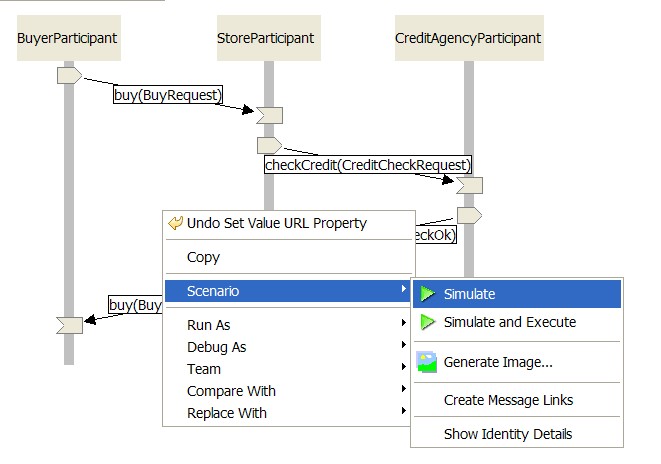
When a scenario is being simulated against a choreography, initially each node will turn yellow indicating that processing of that event has begun. It will then either turn green if it was successfully simulated, or red if an error occurred.
In the case of this specific scenario, created against the choreography defined in the previous chapter, the end result should be as shown below.
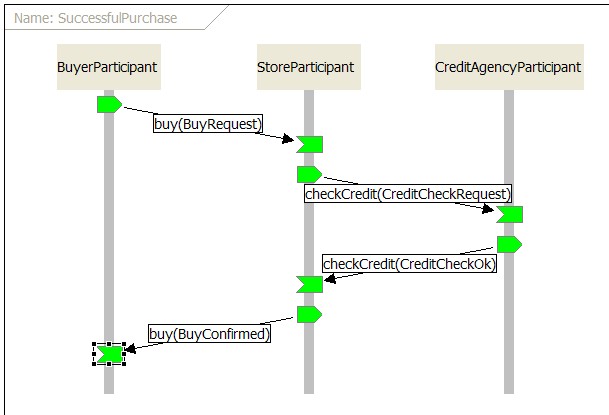
To demonstrate the effect when there is a mismatch between what has been defined in a scenario and the associated choreography, first we must reset the simulation. This can be achieved by selecting the red 'reset' button on the toolbar,

or use the popup menu associated with the Scenario Editor, to select the Scenario->Reset Simulation menu item.
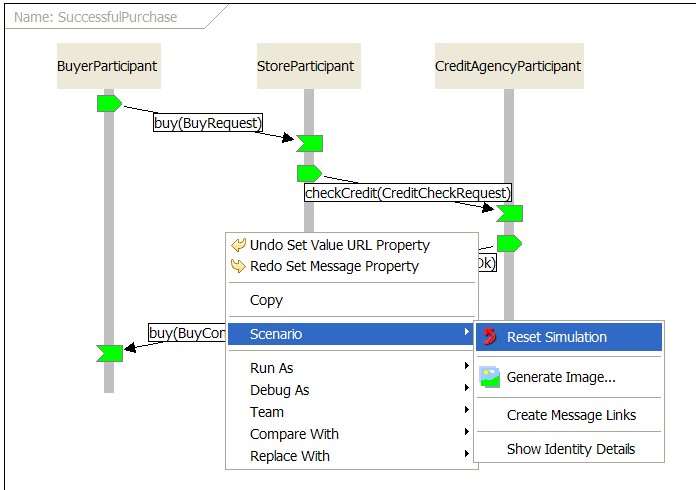
One the simulation has been reset, then select the final buy(BuyConfirmed) message link, and change the Message field in the Properties view to select the buy(BuyFailed) fault sens:BuyFailed entry. Once the scenario has been re-saved, then run the simulation again, and you should see the following result:

The node that is highlighted in 'red' identifies that sending this message type, from the StoreParticipant is invalid based on the behaviour specified in the choreography description. However, from the perspective of the BuyerParticipant it is valid to receive a buy(BuyFailed) message in response to a buy(BuyRequest), and therefore the node at the other end of this message link is shown in 'green'.
This section outlines the differences that will be observed when building a scenario without an associated choreography description. For example, where a new system is being designed, the scenarios can be used to document the requirements before a choreography description is specified.
The first difference to be aware of is when configuring the participants within the scenario. As outlined previously, the Participant palette entry is used to create participant entries in the scenario, and can be configured using the fields in the Properties view.
When a choreography description is associated with the scenario, it is possible to select the Participant Type defined within the choreography description from a dropdown menu associated with the Type field.
When a choreography description is not associated with the scenario, the Type field cannot be specified. This field can only be specified once a choreography description has been created, and associated with the scenario.
Therefore, at this stage in the specification of the scenario, it will only be possible to define information in the instance field. This can be used to provide a hint to the choreography designer, of the nature of the participant, which may help the choreography designer to group relevant 'participants' into Role Types and Participant Types within the choreography.
The configuration of the details associated with a Message Link differ depending on whether a choreography description is associated with a scenario.
As previously described, an associated choreography description provides context that can be used to present a dropdown list of message definitions to be associated with the link.
Where this context information is unavailable (i.e. when no choreography description URL is defined for the scenario), it is necessary for the user to specify individual pieces of information that collectively identify the interaction details, as shown in the following image.
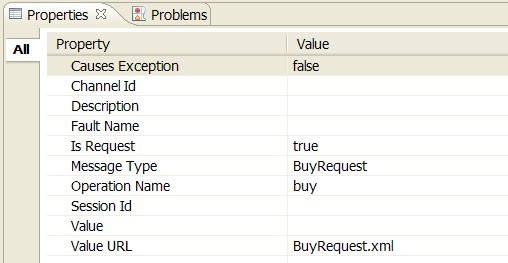
These fields of interest are:
-
Operation Name
This field is optional at this stage. If the message type is unique enough to distinguish the message, in the context of the sending and receiving participants, then the operation name does not have to be specified at this point.
-
Fault Name
This field is optional in general, and is only used to indicate that a response to a previous request (with the same operation name) is a fault of a particular type. However, if the operation name is not defined at this stage, then equally the fault name does not need to be, as long as the message type is distinct for the fault in question.
-
Is Request
This field is used to specify whether the message exchange represents a request (and therefore will be true), or a response/fault/notification (and therefore will be false).
-
Message Type
This field is mandatory, and defines the type of the message being exchanged. The format of the field is "{namespace}localpart". The namespace is optional, and can therefore be excluded as in the image above.
Note
When the choreography description is built, and the URL is set in the scenario, each message link/event should have an appropriate Message property which links to the message definition (combination of operation name, message type, direction, etc) in the choreography. If the appropriate message definition for the details specified in the scenario's message link cannot be found in the associated choreography description, then the Message property will show as blank.
The final aspect of the scenario we wish to look at is also associated with the Message Link or nodes at either end of the link. These are the Session Id and Channel Id fields.
These fields are listed in the Properties view for the selected component, either if no choreography description has been associated with the scenario, or if associated choreography description does not declare any explicit identity information.
If the intention is to define explicit identity information within a choreography description, to be associated with the scenario, then no information needs to be placed within these fields.
However, if the scenario is to be associated with a choreography description that will not define explicit identify details, then values should be supplied for these fields.
The Session Id should have a consistent value throughout the scenario. However the Channel Id should use a distinct id value for each set of interactions between two participants. For example, for each interaction between participant A and B, the channel id could be 'X', but for each interaction between B and C, the channel id could be 'Y'.